
The 2013-2018 Dodge Ram SAE/DOT LED Lightbar Kit delivers powerful forward-facing illumination with a clean, factory-integrated look. This kit comes in two bracket configurations — Standard and Sport/Express — so it fits multiple Ram trim levels. Here's the full install breakdown.

Table of Contents
- Tools Required
- Installation Instructions
- Questions About the Install?
- Shop Dodge Ram Lightbar Kits at Ess K Customs
Tools Required
- 18mm deep well socket
- 10mm wrench
- 10mm socket with extension (Standard bracket kit only)
- Dremel rotary tool (Sport/Express bracket kit only, optional)
Installation Instructions
Before you begin: This kit includes different prep steps depending on your trim and package. Follow the section below that matches your bracket kit (Standard vs. Sport/Express), then continue from Step 3 for both kits.
Standard Bracket Kit
Step 1 — Using a 10mm socket, remove the four bolts holding the bezel to the bumper.
Step 2 — Remove the bezel from the bumper. The bezel will not be used again. Repeat Steps 1-2 on the other side of the vehicle.
Sport/Express Bracket Kit
Step 1 — Remove the trim panel and take it to a soft working surface. Using one of the lightbars as a template, determine where you need to make your cuts on the factory trim panel. Use a Dremel to cut an opening on both sides of the panel.
Step 2 — Confirm your cut is large enough for the lightbar to fit through, then reinstall the trim panel onto the truck.
Both Kits — Continue Here
Step 3 — Remove the two 18mm nuts on the backside of the bumper support and set them aside.
Step 4 — Feed your lightbar bracket through the opening in the bumper, looping the ends around the bolts on the bumper support. The longer arm of the bracket goes toward the center of the vehicle. Hand-tighten the nuts to hold the bracket in place.
New Stage Series Lightbars — Mounting Adapter Bracket: If your kit includes a mounting adapter bracket, install it onto the lightbar before attaching it to the main brackets. Install the included set screws in the center mounting position on both sides of the lightbar, then secure the adapter using the included Torx screws in the top and bottom mounting holes. Once the adapter is locked in, use the supplied hex bolt to mount the lightbar to the main bracket as normal.
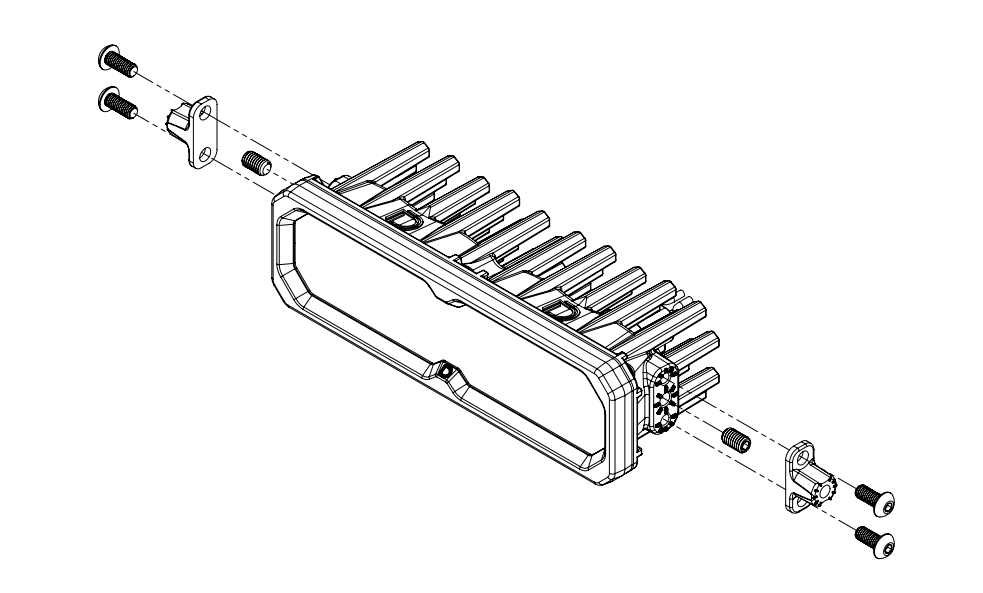
Step 5 — Secure the lightbar to the bracket and hand-tighten with the included screws.
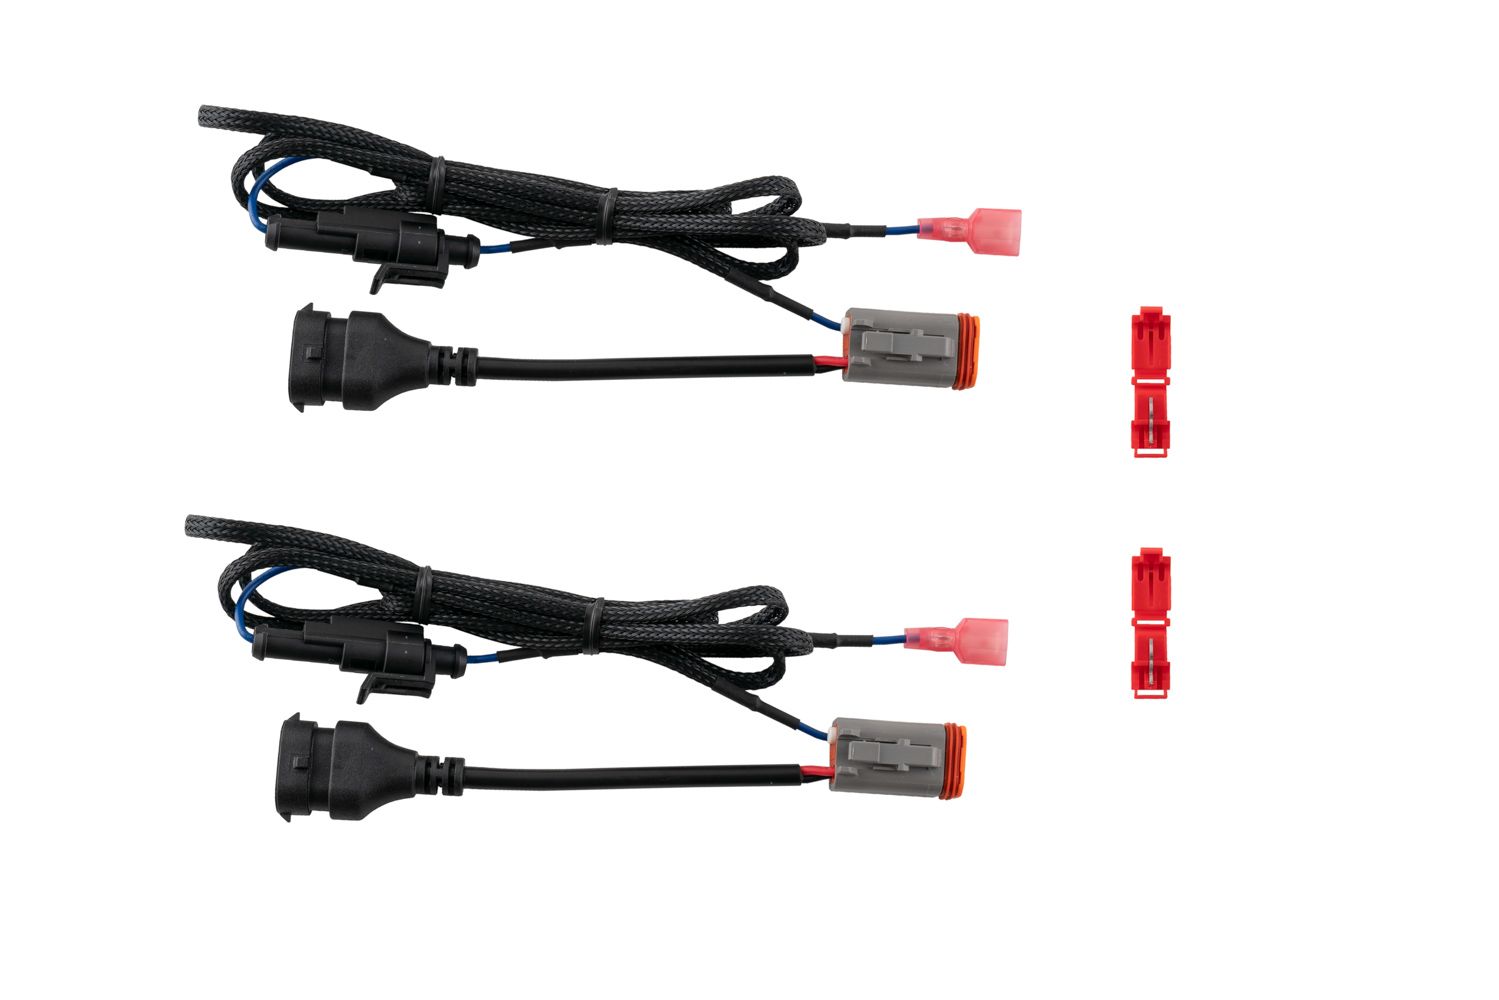
Connect Backlight Wire (Optional): New Stage Series Light Bars feature an integrated amber backlight that illuminates the TIR optic, creating a distinctive accent look while improving visibility when parked or stopped. If your light bar has the backlight function, connect the blue wire with the red male spade connector to a fused 12V source. The parking light or sidemarker circuit is commonly used so the backlight activates with your vehicle's exterior lighting.
Use the included T-taps to make the connection: position the T-tap over the selected wire, use needle-nose pliers to fully seat and crimp the tap, and insert the red male spade connector until secure.
NOTE: The power source must be fused. Do not connect the backlight wire directly to the vehicle battery.
Step 6 — Adjust the lightbar to your desired height, then fully tighten using an 18mm socket.
Step 7 — Test thoroughly and aim the light bar where you want it before tightening all mounting hardware. Check your local laws and regulations for aiming, installation, and applicability. The install is complete.
Questions About the Install?
If you run into any issues during the installation, contact Ess K Customs — as an authorized Diode Dynamics dealer, we're here to help.
Shop Dodge Ram Lightbar Kits at Ess K Customs
Ready to upgrade your Ram with an SAE/DOT LED Lightbar Kit? As an authorized Diode Dynamics dealer, Ess K Customs carries genuine products with full manufacturer warranty.
Shop 2013-2018 Dodge Ram Standard SAE/DOT LED Lightbar Kit →
Shop 2013-2018 Dodge Ram Sport/Express SAE/DOT LED Lightbar Kit →
This install guide applies to Diode Dynamics SKUs: DD8859, DD8605, DD8609, DD6012, DD8861, DD8607, DD8611, DD8860, DD8606, DD8610, DD6013, DD8862, DD8608, DD8612, DD6015, DD8864, DD8866, DD8865, DD8867, DD8613, DD8615, DD8614, DD8616, DD8617, DD8619, DD8618, DD8620, DD6016, DD6017, DD6019, DD8858, DD8863