
The Elite Series Headlight install for the 2018+ Jeep JL Wrangler and 2020+ JT Gladiator is a complete bolt-on upgrade with plug-and-play wiring. This guide covers grille removal, headlight swap, turn signal adapter routing, DRL wiring, offroad light wiring, aiming, and programming.
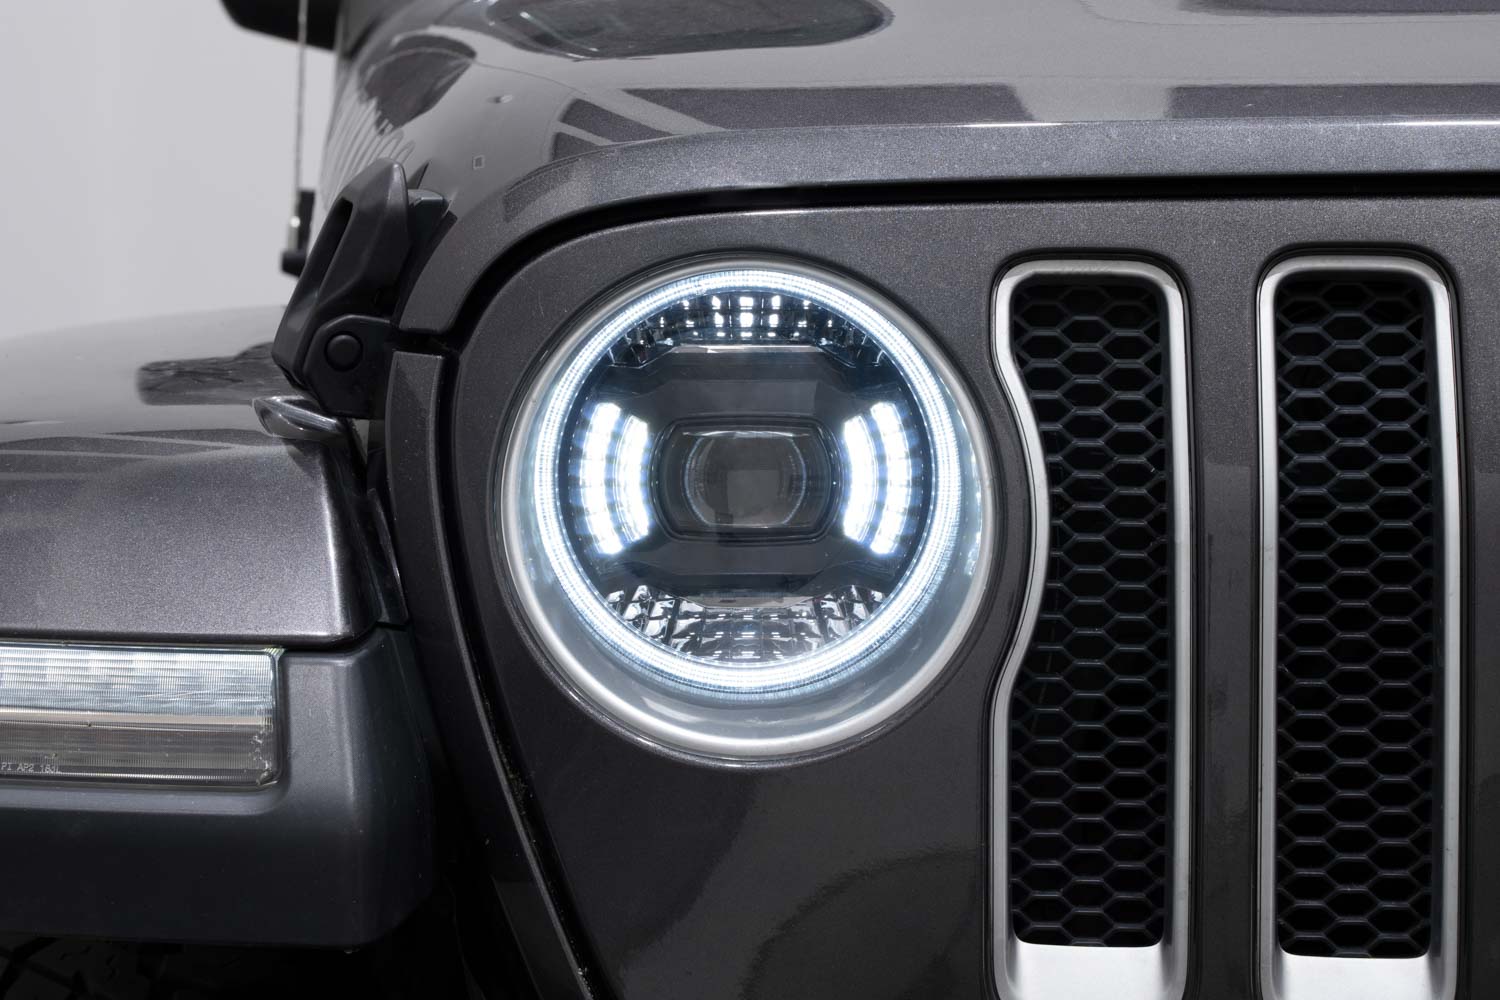
Table of Contents
- Installation Video
- Grille Removal
- Headlight Removal and Installation
- Turn Signal Adapter Routing
- DRL and Auxiliary Tap Wiring
- Offroad Light Wiring
- Headlight Aiming
- DRL and Show Mode Programming
- Uconnect Setting
- Questions About the Install?
- Shop Jeep Headlights at Ess K Customs
Installation Video

Step 1 — Remove the Grille
Open the hood and pull the rubber weatherstrip away from the top of the grille. Remove the seven T15 Torx screws along the top. Release the four push clips on the bottom edge of the grille — press the center pin, then pull the clip out. Pull the grille straight forward and off the vehicle.

Step 2 — Remove Factory Headlights and Install Elite Series
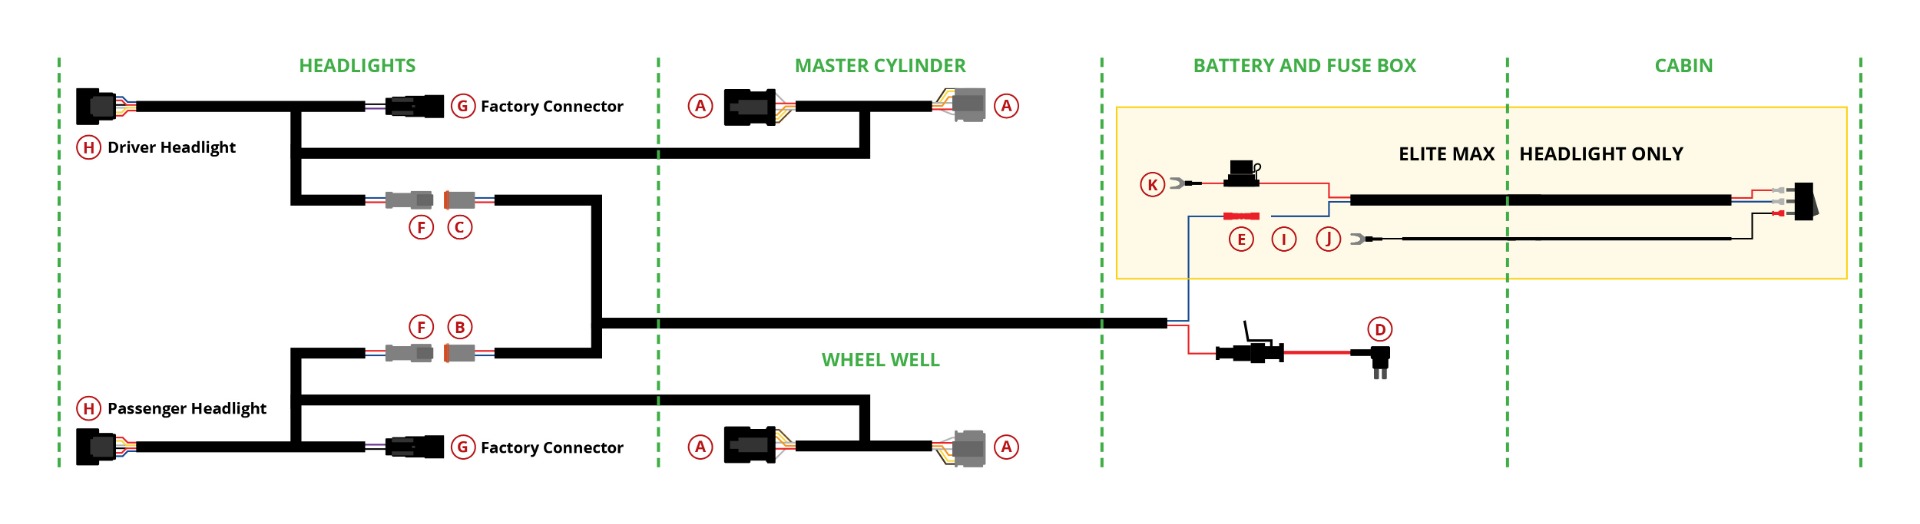
Unplug the factory headlight connector. Remove the single T15 Torx screw at the top of the headlight. Slide the headlight toward the center of the vehicle, then pull straight out. Remove the factory headlight connector and H13 bulb adapter and set aside — the Elite Series uses its own integrated LED assembly. Connect the Elite Series H13 power plug to the factory headlight connector. Route the turn signal adapter harness and DRL harness before sliding the new headlight into position. Reinstall the T15 Torx screw. Repeat on the other side.

Step 3 — Route Turn Signal Adapters
The Elite Series headlights include turn signal adapters that tap into the factory turn signal to enable the switchback DRL feature. Routing is slightly different per side.

Driver's Side: Route the turn signal adapter through the gap between the hood latch bracket and the core support. Follow the factory wiring loom toward the driver's side fender and connect inline with the factory turn signal connector near the fuse box area.
Passenger Side: Route the adapter across the top of the core support to the passenger side. Follow the factory loom and connect inline with the passenger turn signal connector.
Tip: The turn signal adapters are side-specific — check for driver/passenger labels before routing.
Step 4 — DRL and Auxiliary Tap Wiring
The included DRL auxiliary tap harness provides a constant 12V power source for the daytime running lights. Route the harness to the fuse box under the hood. Using the included add-a-fuse adapter, tap into an always-on fuse slot in the under-hood fuse box. Connect the ring terminal to a grounding point on the chassis. The DRL will now function with the vehicle running.

Step 5 — Offroad Light Wiring
The Elite Series headlights include a dedicated offroad light output. There are two methods to wire offroad functionality:
Method 1 — Factory Auxiliary Switch Bank (if equipped): Connect the offroad wire to the factory auxiliary switch wiring using the included connector. This integrates offroad control with the Jeep's factory switch panel.
Method 2 — Toggle Switch (all models): Use the included toggle switch and relay harness. Mount the toggle switch in a convenient cabin location. Route the relay harness to the battery — connect the red wire to the positive terminal and the black wire to the negative terminal or a chassis ground. Connect the offroad output wires from each headlight to the harness output.
Step 6 — Headlight Aiming
Park the vehicle on a flat surface 25 feet from a wall. Use the integrated vertical and horizontal adjusters on each headlight to set the beam pattern. The hot spot should be centered horizontally and slightly below headlight height. Adjust until even left-to-right.
Step 7 — DRL and Show Mode Programming
Elite Series headlights include selectable DRL color modes. Elite Max models also include Show Mode. See the full programming guide for step-by-step DRL and Show Mode instructions.
Uconnect Setting
After installation, navigate to your Jeep's Uconnect system: Vehicle Settings → Lights → Headlight Illumination On Approach. Turn this setting off to prevent the headlights from cycling on their own when the vehicle is locked/unlocked, which can interfere with DRL programming.
Questions About the Install?
If you run into any issues during installation, contact Ess K Customs — as an authorized Diode Dynamics dealer, we're here to help.
Shop Jeep Headlights at Ess K Customs
Ready to upgrade your JL Wrangler or JT Gladiator with Elite Series Headlights? As an authorized Diode Dynamics dealer, Ess K Customs carries both Elite and Elite Max models with full manufacturer warranty.
Browse Jeep Elite Series Headlights at Ess K Customs →
This install guide applies to Diode Dynamics SKUs: DD5165, DD5166