
The SS5 Grille CrossLink LED Lightbar Kit adds a high-power LED lightbar behind the grille of your 2021-2023 Ford F-150. Available as a 2-pod or 5-pod CrossLink configuration, this kit mounts using dedicated brackets at factory mounting points behind the bumper. Here's the full walkthrough.
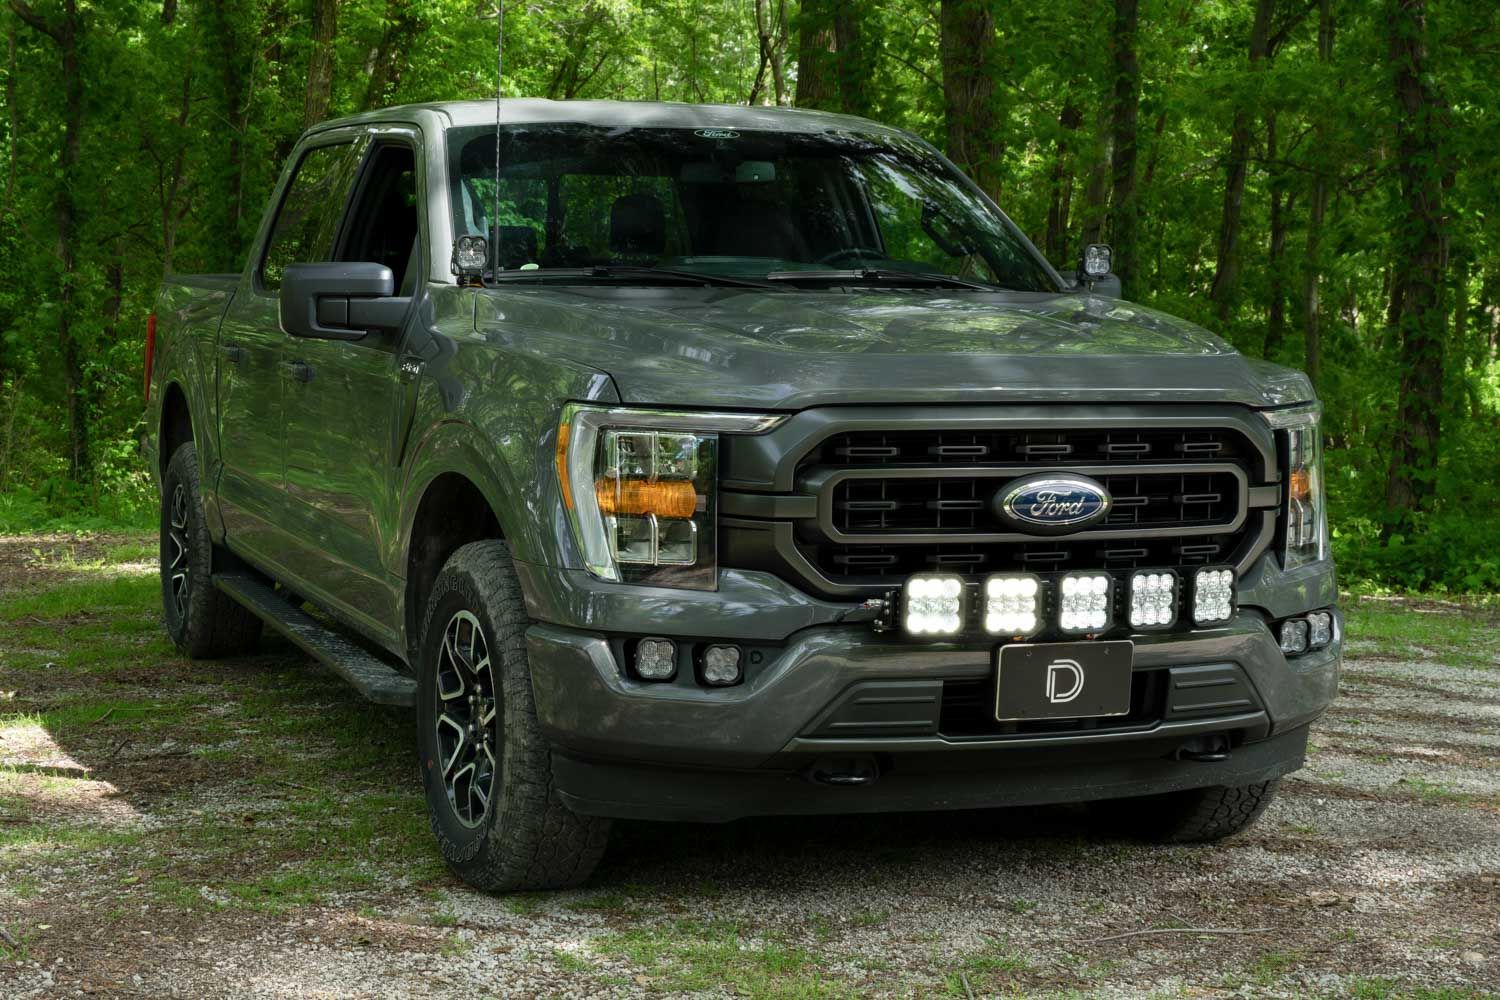
Table of Contents
- Installation Video
- Tools Required
- Mounting Instructions
- Wiring Instructions
- Questions About the Install?
- Shop F-150 Lighting at Ess K Customs
Installation Video
Tools Required
- Plastic trim removal tool
- Ratchet
- 7mm socket
- 8mm socket
- 10mm socket
- 13mm socket
- 5mm Allen wrench
Mounting Instructions
Step 1 — Remove the Upper Bumper Valance
Using a 7mm socket, remove the two screws securing the fender liner to the upper bumper valance on one side. Pull the sides of the valance loose from the fender well and fender. Repeat on the opposite side, then pull the valance off entirely — start from the outside and work your way to the middle, releasing the tabs as you go.
Step 2 — Remove the Trim Panel and Grille
Remove the trim panel on the radiator core support by pulling out the thirteen tree clips securing it. Disconnect the harnesses near the hood latch and remove the clip securing the harness to the grille. Remove the four 10mm screws securing the grille to the top of the core support and the two 8mm screws on the bottom of the grille (next to the headlamp screws). Pull the grille firmly away from the radiator to remove it.
Step 3 — Mount the Main Brackets
Remove the two 13mm bolts behind the bumper and install your new grille brackets using those mounting holes. Important: The outer bolt (silver, attached to strut) must remain in the same location for proper thread engagement. Do not interchange the two bolts — the shorter black-head bolt won't engage correctly in the strut mount location. Loosen both bolts slightly, hinge the bracket up and down around the outer bolt, pull the inner side downward, then tighten the inner bolt first followed by the outer bolt for proper alignment.
Step 4 — Route the Wire Harness
Route the included wiring harness through the opening in the rubber seal next to the bracket. Note: the connector will not fit through the opening once the plastic valance is installed, so route wires before reassembly.
Step 5 — Reinstall the Grille and Valance
Reverse the removal steps to reinstall the grille, trim panel, and plastic valance.
Step 6 — Mount the Lightbar (2-Pod Kit)
If installing two pods, use the included universal mounting brackets and hardware to install directly onto the base brackets.
Step 6 — Mount the Lightbar (5-Pod CrossLink Kit)
If installing the 5-pod CrossLink lightbar, install the SS5 low-mount brackets onto the grille brackets using the provided M6 hardware. Assemble your SS5 lightbar using the included CrossLink lightbar instructions — secure the CrossLink to the bottom of the second notch on the link for the correct curve. Mount the assembled lightbar onto the low-mount brackets using one 10mm bolt on each side. Rotate the lightbar upward, expose the end bolt in the pivot mount, tighten with a 5mm Allen wrench, then rotate back down and install the remaining two 10mm bolts. Adjust the gap on the opposite pivot mount and secure with the Allen wrench.
Wiring Instructions
Note: The following instructions are for F-150s with an Auxiliary Switch Bank. If you don't have one, use the included toggle switch adapter wire to route a switch. All power sources must be fused.
Step 7 — Connect to Auxiliary Switches
Locate the auxiliary switch wiring near the battery. Check your owner's manual in the head unit to determine the correct wire color based on amperage rating. Connect the yellow main beam wire to an auxiliary switch wire using the included butt connector. Connect the blue backlight wire to another auxiliary switch location (or tap into an existing Stage Series backlit light switch if already installed).
Step 8 — Connect Battery Leads and Test
Connect positive and negative battery wires to the battery or to main power terminals near the fuse box. Secure all wires, test thoroughly, and tighten all hardware. The install is complete.
Questions About the Install?
If you run into any issues during the installation, contact Ess K Customs — as an authorized Diode Dynamics dealer, we're here to help.
Shop F-150 Lighting at Ess K Customs
Looking for lighting upgrades for your 2021-2023 Ford F-150? As an authorized Diode Dynamics dealer, Ess K Customs carries genuine products with full manufacturer warranty.
Browse F-150 Grille Lightbar Kits at Ess K Customs →
This install guide applies to Diode Dynamics SKUs: DD7316P, DD7317, DD7318, DD7321, DD7322, DD7325P, DD7326, DD7327, DD7328, DD7329, DD7330, DD7331, DD7332, DD7333